FMOD events in Godot 4 can be played in three different ways:
- Using the provided StudioEventEmitter3D or StudioEventEmitter2D nodes.
- Using the provided
play_one_shothelper methods in code. - By manually managing Events in code.
These methods have practical advantages and disadvantages:
- The StudioEventEmitter node allows us to play Events without code. We can set initial parameters for the Event in the inspector and in combination with the StudioParameterTrigger node, we can also set parameters of the Event (if needed).
- With the play_one_shot helper methods we can play a sound with just one line of code. The integration automatically takes care of the playback and stops/releases the sound instance from memory when the Event finishes playing.
- Manual Event management and playback, on the other hand, requires more code, but is much more flexible to handle, as you can specify exactly when a sound or loop should play and stop, and where parameter changes should be made.
1. Playing FMOD Events with the StudioEventEmitter node
For simple Event playback, we can add a new StudioEventEmitter3D (or 2D) node to the scene tree:
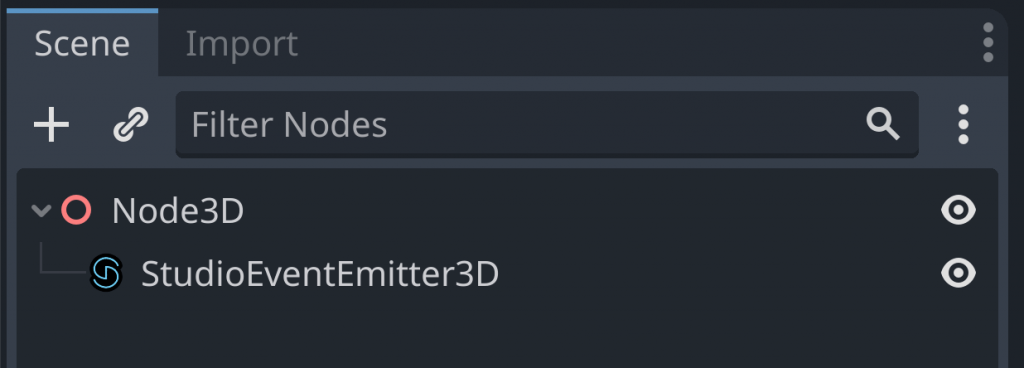
Remember that you will need to load the banks containing your desired Event and add a StudioListener node to the Scene Tree.
By clicking on the StudioEventEmitterNode we find various settings in the inspector that we can change to influence the playback of our Event:
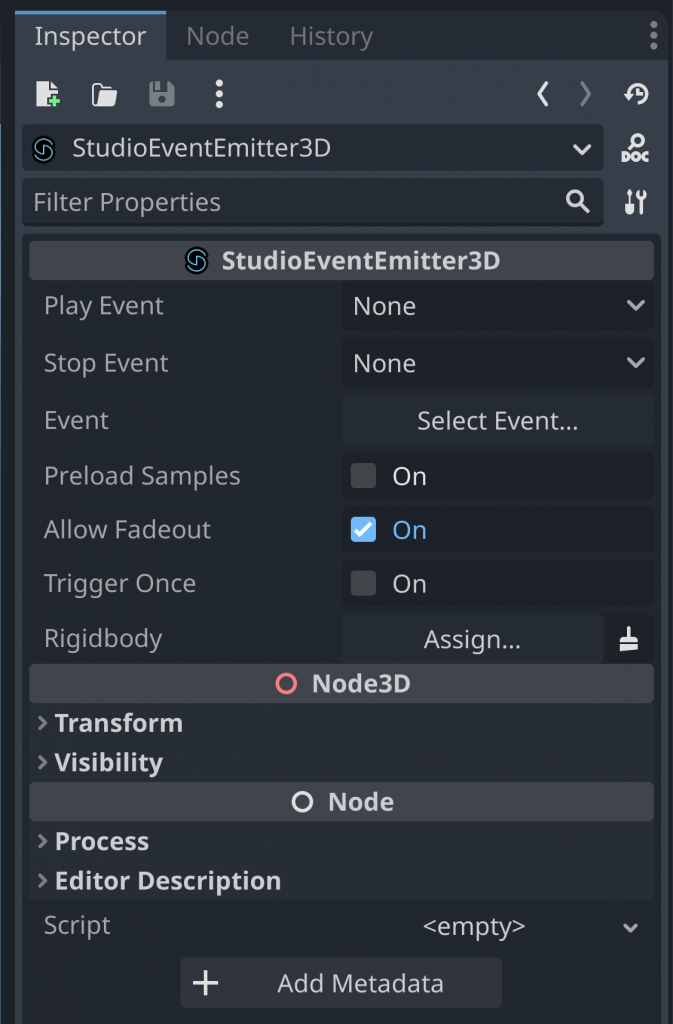
- Under Play Event and Stop Event we determine when the Event should be played and stopped.
- In Event, we select the Event from a list of events that we have previously created in FMOD Studio.
- Preload Samples will preload the sample data for the Event when the Node enters the Scene Tree.
- Allow Fadeout respects the release value of the AHDSR modulator.
- Trigger Once will trigger the Event only once as the name suggests.
2. Using the play_one_shot helper functions
The integration ships with six helper functions for playing simple one shots:
play_one_shot(event_asset: EventAsset, position = null)play_one_shot_path(event_path: String, position = null)play_one_shot_id(guid: String, position = null)play_one_shot_attached(event_asset: EventAsset, node)play_one_shot_attached_path(event_path: String, node)play_one_shot_attached_id(guid: String, node)
In general, play_one_shot will immediately create, play and release an instance of an FMOD Event. play_one_shot_attached creates an instance of an Event and attaches it to a node to specify the position of the instance. The instance is played to the end and parameters cannot be set.
You can find these functions in the FMODRuntime singleton.
Let’s look at some examples of the 6 functions one by one:
play_one_shot
This function take an EventAsset and optionally a second parameter that can be a Node2D, Node3D, Transform2D, Transform3D, Vector2 or Vector3.
To get an EventAsset in the first place, export a variable with the type hint in your script:
extends Node3D

@export var event: EventAsset
If you save and have a look at the inspector of the node your script is attached to, the new property named Event will appear:
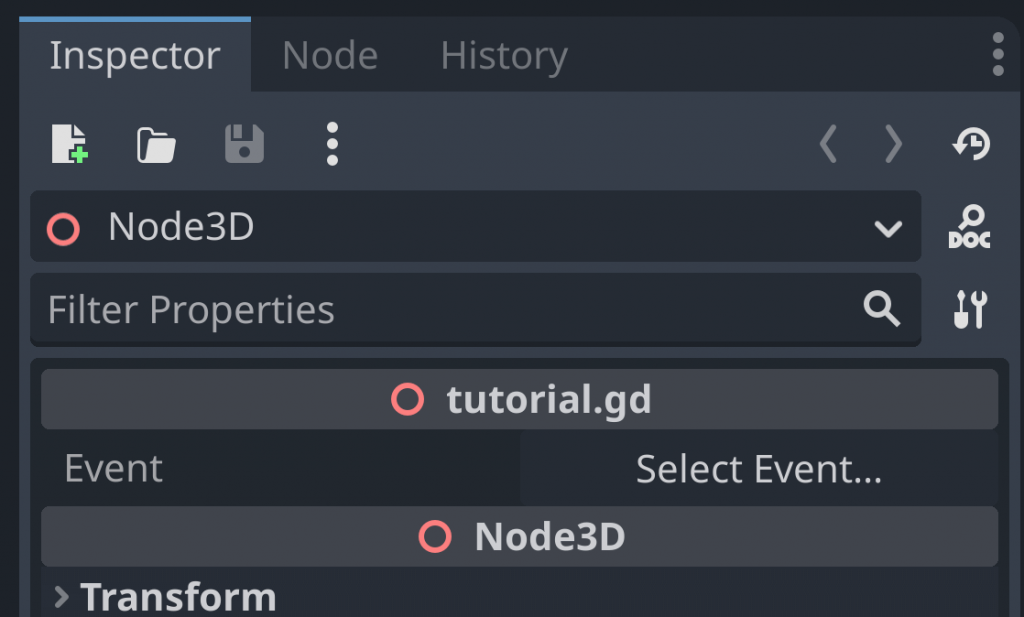
Clicking on the button Select Event will open up a browser in which you can select your desired event:
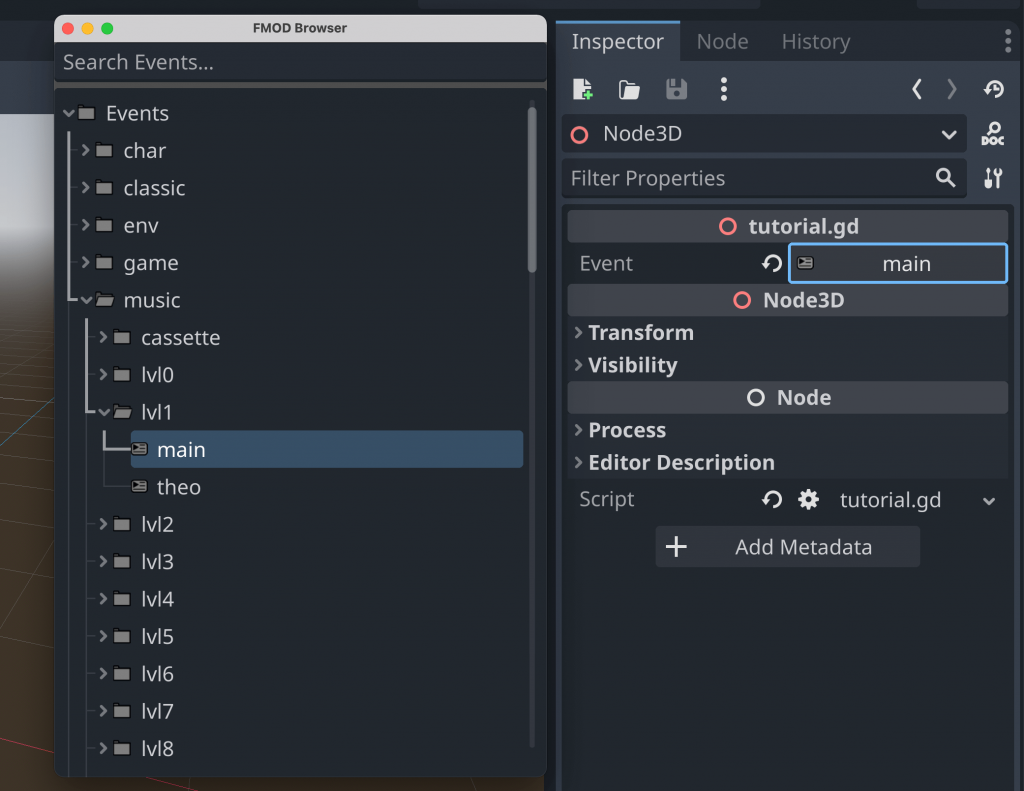
You then can use the play_one_shot helper functions like this:
extends Node3D

@export var event: EventAsset

func _ready():
	FMODRuntime.play_one_shot(event)
	FMODRuntime.play_one_shot(event, self)
	FMODRuntime.play_one_shot(event, get_global_transform())
	FMODRuntime.play_one_shot(event, Vector3(1, 5, 7))
If you don’t need to set a position for your Event (if it is 2D), omit the optional position parameter.
play_one_shot_path
play_one_shot_path is similar to the previous function, it only takes an event path instead of the EventAsset:
func _ready():
	FMODRuntime.play_one_shot_path("event:/TestEvent")
event:/TestEvent is a path that points to an Event that we create in FMOD Studio. The paths follow the folder structure in the FMOD Studio Event hierarchy. You can right-click on an Event in FMOD Studio to copy its path.
Important: Using the path versions of FMOD functions in the integration requires the .strings version of the Master Bank to be loaded alongside the Master Bank.
play_one_shot_id
If you have generated the GUIDs file, as detailed in the getting started guide, you can directly pass the GUID of an Event by accessing the Event class in the FMODGuids class:
func _ready():
	FMODRuntime.play_one_shot_id(FMODGuids.Events.MUSIC_CASSETTE_02_OLD_SITE)
play_one_shot_attached
Similar to play_one_shot, we can play a one-shot Event and attach the instance to a specific Node that inherits from Node3D or Node2D. The sound will update its position according to the positional information of the Node:
extends Node3D

@export var event: EventAsset

func _ready():
	FMODRuntime.play_one_shot_attached(event, self)
play_one_shot_attached_path
Similar to play_one_shot_path we can specify an actual event path instead of selecting an EventAsset in the inspector:
extends Node3D

func _ready():
	FMODRuntime.play_one_shot_attached_path("event:/TestEvent", self)
play_one_shot_attached_id
This is the equivalent of play_one_shot_id for attached instances:
extends Node3D

func _ready():
	FMODRuntime.play_one_shot_attached_id(FMODGuids.Events.MUSIC_LVL2_MIRROR, self)
The difference between an FMOD Event and an EventInstance
An Event is a sound unit that you create in FMOD Studio. It can have various tracks, parameters and automations. A copy or instance of the event is created in-game. You don’t start the Event itself, but you create an instance from that Event. This allows you to have multiple copies of an event playing at the same time.
3. Manual playback and management of FMOD Events in Godot 4
Four steps are necessary to manually play an FMOD Event in Godot:
- We need to declare and create an instance of an Event (
EventInstance). - Starting the instance.
- Optionally stopping the instance.
- Releasing the instance from memory.
Let us now go through these steps one by one.
1. Creating the EventInstance
We need to declare the Event which we will select in the inspector and an instance before proceeding. In our case, we declare a new variable with the type hint EventAsset and another variable with the type hint EventInstance at the top of our Godot script:
As an example, we can now create the instance inside Godot’s _enter_tree or _ready functions by calling the helper function create_instance in the FMODRuntime helper class:
extends Node3D

@export var event: EventAsset
var instance: EventInstance

func _ready():
	instance = FMODRuntime.create_instance(event)
Keep in mind that you have to select the Event in the inspector for this to work. Alternatively you can use the alternate versions of create_instance, namely create_instance_path or create_instance_id:
extends Node3D

var instance: EventInstance

func _ready():
	# Providing a path:
	instance = FMODRuntime.create_instance_path("event:/TestEvent")
	# Or a GUID:
	instance = FMODRuntime.create_instance_id(FMODGuids.Events.MUSIC_LVL6_MAIN)
2. Starting the EventInstance
After that, the Event can be started by calling instance.start():
extends Node3D

@export var event: EventAsset
var instance: EventInstance

func _ready():
	instance = FMODRuntime.create_instance(event)
	instance.start()
3. Stopping the EventInstance
Stopping an EventInstance involves calling stop on the instance:
instance.stop(FMODStudioModule.FMOD_STUDIO_STOP_ALLOWFADEOUT)4. Releasing the EventInstance
Attention: With this manual method, the instances are not automatically released from the memory. This can lead to memory leaks. We add instance.release() after the instance has been started so that the instance is freed from memory after it finishes playing:
extends Node3D

@export var event: EventAsset
var instance: EventInstance

func _ready():
	instance = FMODRuntime.create_instance(event)
	instance.start()
	instance.release()
Playing loops with FMOD in Godot 4
Loops can be played most safely using the manual method. But how do we create loops and how do we play and stop them in Godot?
In FMOD Studio, a loop region can be created by right-clicking on the timeline and selecting the “Add Loop Region” entry:
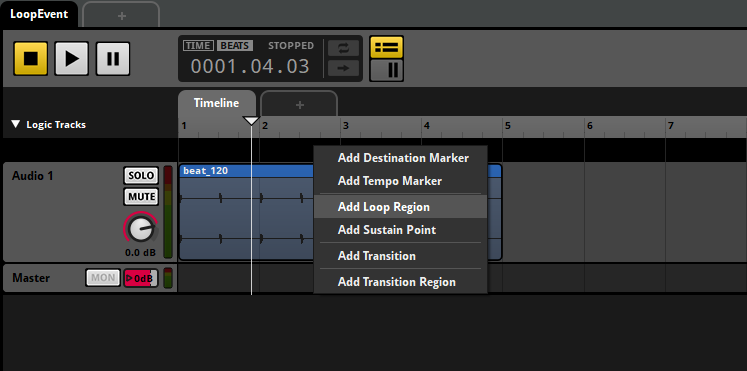
Then we can move the loop region as far as we want, similar to some DAWs. Move the loop region so that it encompasses the entire audio instrument, save and build the project.
In your Godot project, try to playback this new Event. You will notice that the sound is now looping if you play the Event back.
Stopping loops with FMOD in Godot 4
As we showed in the manual management of instances, we can call stop on the EventInstance to stop it. In this example script we are checking if the S key was pressed and if that is the case we stop and release the playing instance:
extends Node3D

@export var event: EventAsset
var instance: EventInstance

func _ready():
	instance = FMODRuntime.create_instance(event)
	instance.start()

func _input(input_event):
	if input_event is InputEventKey and input_event.pressed:
		if input_event.keycode == KEY_S:
			instance.stop(FMODStudioModule.FMOD_STUDIO_STOP_ALLOWFADEOUT)
			instance.release()
FMODStudioModule.FMOD_STUDIO_STOP_ALLOWFADEOUT will respect the release time in the AHDSR modulator of the Event (if any present). If we want an abrupt stop, we use FMODStudioModule.FMOD_STUDIO_STOP_IMMEDIATE instead.
Playing 3D FMOD Events in Godot
3D Events differ from 2D Events in that they play a 3D sound with spatialization (Spatializer effect). The effects adds volume attenuation based on the distance from the instance to the listener, and a panning based on the position of the instance in the direction in which the listener is directed.
An Event doesn’t necessarily need a spatialization effect to be a 3D event. It can also use built-in parameters (such as distance, direction, etc.) to automate properties such as volume and filters to give the impression of spatialization.
In FMOD Studio, a 2D event can be easily converted to a 3D event by adding the Spatializer effect to the master track of an event:
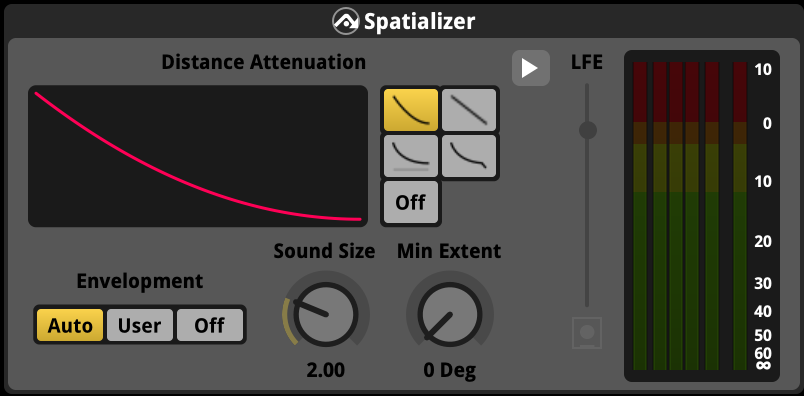
You can find in-depth information about the spatializer effect in the FMOD documentation. I will list the most important features here:
- Envelopment: Envelopment determines the extent of the event at any distance from the listener. The Auto mode sets the minimum expansion to 0 degrees and sets the Sound Size to twice the Min-Distance property of the Event.
- The User mode allows us to manually set the sound size and minimum expansion of the Spatializer, and the Off Mode disables the sound size and minimum expansion.
- Min & Max Distance and Distance Attenuation Curve: The Min and Max distance of the Event and the Distance Attenuation curve of the Spatializer determine together how much the signal is attenuated at different distances. The signal is not attenuated if the listener is within the minimum distance of the spatializer, is -oo dB if the listener is outside the maximum distance, and drops according to a linear quadratic curve as the listener moves from the minimum distance to the maximum distance. Depending on the curve, the signal drops off differently.
The Min & Max Distance settings were previously displayed in the Spatializer effect but have been moved to the Event Macros at the bottom right of the screen in the latest FMOD Studio versions:

In the code itself, we only need to make one minor change, namely to tell FMOD where the instance is located in 3D space. We also have two different options here. Either we do this directly in the _process callback of a script that extends Node2D or Node3D:
extends Node3D

@export var event: EventAsset
var instance: EventInstance
var attributes: FMOD_3D_ATTRIBUTES = FMOD_3D_ATTRIBUTES.new()

func _ready():
	instance = FMODRuntime.create_instance(event)
	instance.start()

func _process(delta):
	RuntimeUtils.to_3d_attributes(attributes, get_global_transform())
	instance.set_3d_attributes(attributes)
Or we “attach” the EventInstance to the Node after we have created the instance:
extends Node3D

@export var event: EventAsset
var instance: EventInstance
var attributes: FMOD_3D_ATTRIBUTES = FMOD_3D_ATTRIBUTES.new()

func _ready():
	instance = FMODRuntime.create_instance(event)
	instance.start()
	FMODRuntime.attach_instance_to_node(instance, self)
As you can see in both methods, you will need to create an instance of FMOD_3D_ATTRIBUTES:
var attributes: FMOD_3D_ATTRIBUTES = FMOD_3D_ATTRIBUTES.new()4. Creating and managing instances without the FMODRuntime helper class
The integration exposes a StudioSystem object that you can use to manage instances without having to rely on the FMODRuntime helper class. You can get StudioSystem by calling get_studio_system on the FMODStudioModule singleton.
extends Node3D

@export var event: EventAsset
var instance: EventInstance

func _ready():
	var studio_system: StudioSystem = FMODStudioModule.get_studio_system()
	var event_description: EventDescription = studio_system.get_event_by_id(event.guid)
	instance = event_description.create_instance()
	instance.start()
	instance.release()
Troubleshooting
If anything goes wrong when calling any FMOD functions displayed in this article, you might get warnings in the errors tab of Godot’s debugger:
W 0:00:00:0976   runtime_manager.gd:58 @ get_event_description_id(): [WARNING]: The requested event, parameter, bus or vca could not be found. StudioApi::StudioSystem::get_event_by_id in src\api\studio_api.cpp:148
  <C++ Source>   core/variant/variant_utility.cpp:900 @ push_warning()
  <Stack Trace>  runtime_manager.gd:58 @ get_event_description_id()
                 runtime_manager.gd:80 @ create_instance_id()
                 runtime_manager.gd:119 @ play_one_shot_id()
                 runtime_manager.gd:115 @ play_one_shot_path()
                 tutorial.gd:4 @ _ready()
The warning will include information about the actual C++ function that triggered the warning. For example:
StudioApi::StudioSystem::get_event_by_id in src\api\studio_api.cpp:148
This is useful when posting a new issue in the GitHub repository. Please attach these warnings when you encounter any error.
Error: The requested event, parameter, bus or vca could not be found
As this error description suggests, the Event you are trying to play couldn’t be found. This can happen if you have a typo in the event path you are passing to the relevant function. It can also happen if you forgot to include the relevant Event into the Bank you are loading (this is process you do in the FMOD Studio authoring application).
In most cases, this usually happens if you didn’t load the Bank containing the Event before trying to play it, or if you loaded the Bank too late. Check exactly when the Bank loading is happening. If you are using the StudioBankLoader node and loading the banks when entering the Scene Tree, also playing the Event at _enter_tree might trigger this. Try to move the Event playback to _ready.