We can take advantage of Unreal Engine’s Audio Volumes to trigger FMOD Snapshots and to apply ambient effects to single FMOD Events. With Audio Volumes we can easily create Reverb Zones and modify the sound of Events in our game. Let’s go though the steps needed to achieve this.
Reverb Zone setup in FMOD Studio
Create a new Return track and insert a Reverb effect into the bus (full wet and zero dry setting). Add a Send on a bus of your choice. Create a new overriding Snapshot and increase the value of the Send when the Snapshot is active. Build the banks and head over to the Unreal Editor.
Reverb Zone setup in Unreal Engine 4
In Unreal Engine, drag and drop an Audio Volume to the level and resize it accordingly to your likings:

In the Details tab of the Audio Volume, select the FMOD Snapshot we created earlier in the Reverb Effect field:

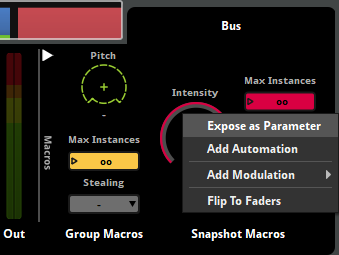
The Fade Time setting only applies to the Snapshot if you exposed the intensity of the Snapshot as a Parameter:

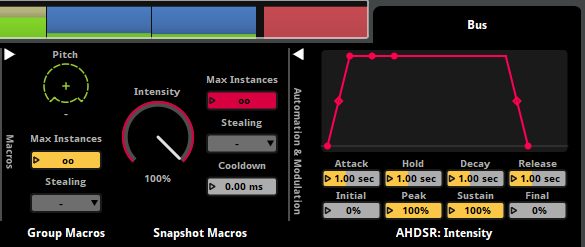
Another way to fade the Snapshot in and out is to apply an AHDSR Modulator to the Intensity knob:

Without these settings, the Snapshot will instantly be activated and deactivated when entering and leaving the Audio Volume. Start the level and move in and out of the Audio Volume. You should be able to hear the Snapshot being activated accordingly to your settings.
Ambient Zone setup in FMOD Studio
To correctly use the Ambient Zone settings present in Unreal Engine 4 we have to create two additional parameters. I will name the parameters AVolume and ALPF. One parameter will be used to control the volume of Events inside and outside of the Ambient Zone. The second parameter will control the frequency of a low pass filter of events inside and outside of the Ambient Zone. Create the continuous AVolume parameter with a range between 0 and 1 and map it to the Gain effect:

Similarly, create the ALPF parameter with a range between 0 and 22000 and map it to the frequency of a low pass filter:

Since Unreal Engine strangely sends 20000 as the default value for the low pass parameter, make sure to move the automation curve a bit, so 20000 is actually 22000 and keep that in mind when planning to make changes.
Ambient Zone Setup in Unreal Engine 4
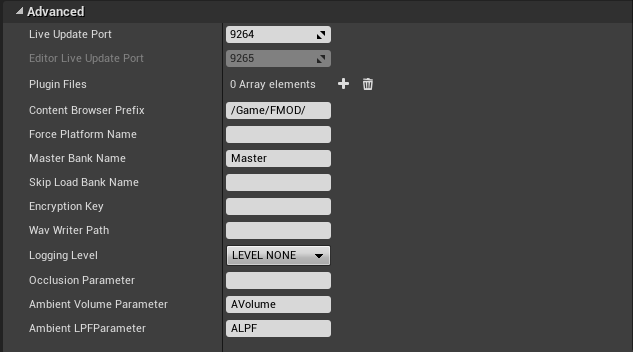
We have to set up the Ambient Zone parameter names in Unreal’s project preferences. Navigate to FMOD’s Studio Plugin settings and insert the parameters we created in the Ambient Volume Parameter and AmbientLPFParameter fields:

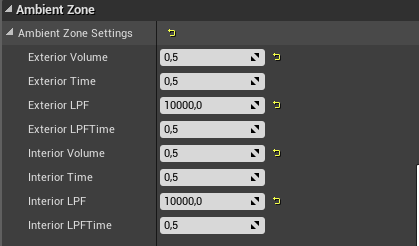
After that, by selecting the Audio Volume, we can change the Ambient Zone settings:

Here you can find a quick overview about these settings:
- Exterior Volume – The volume of the sounds placed outside the volume when the player is inside the volume.
- Exterior Time – The time it will take for the Exterior Volume to kick in.
- Exterior LPF – The frequency of the low pass filter that should be applied to the sounds outside the volume.
- Exterior LPFTime – How quickly should the LPF be applied.
- Interior Volume – The volume of the sounds placed inside the volume when the player is outside the volume.
- Interior Time – The time it will take for the Interior Volume to kick in.
- Interior LPF – The frequency of the low pass filter that should be applied to the sounds inside the volume when the player is outside the volume.
- Interior LPFTime – How quickly the low pass filter should be applied.
Place the sound with the two parameters outside of the Ambient Zone, try to place it inside and experiment with the available settings to get a feeling for how the Ambient Zones can positively affect your sound. Add the two parameters to other Events and experiment further with multiple sound sources.