FMOD Parameters are useful for making changes to FMOD events or snapshots using game variables. If we want to change our music dynamically or link sounds to certain variables: the use of parameters is important and fun!
Download the Unity & FMOD project for this tutorial (Unity 2020.3.22f1, FMOD 2.02.03). If you get any errors after opening the project, please delete the FMODStudioCache.asset file, as it will still contain the old path to the FMOD Studio Project.
This video tutorial is based on an older version of FMOD Studio (2.0.1) and Unity 2019.1.2f1. Most of the code is still valid, but keep in mind that some things might have changed in the meantime. The document below always contains information about the latest version.
How do FMOD Parameters work in FMOD Studio?
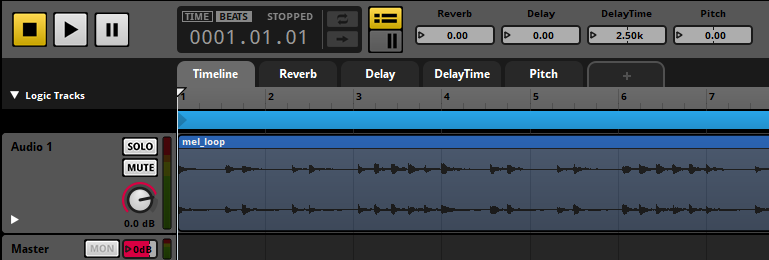
Each Event in FMOD Studio begins with a parameter called a Timeline.
The timeline has the special feature of progressing automatically: As long as the event is playing, the value of the timeline parameter increases continuously. Imagine the typical timeline of a DAW that goes linearly from left to right:

Other parameters are collectively referred to as Game Parameters because they are used to represent the state of the game:

The current value of any parameter can be changed dynamically in the engine. Parameter values can also be controlled by modulators or by events that refer to the event in which the parameter is located. Each instance of an event can have different parameter values, so different instances of the same event can deliver a highly diverse listening experience.
The values of the parameters can be updated using code in the game, but can also be set by automation and adjusted by modulators.
In the attached project, I created four parameters for an event, each associated with FMOD Studio effects:
- Reverb: Controls the wet value of the reverb effect (0-1)
- Delay: Controls the wet value of the delay effect (0-1)
- DelayTime: Controls the delay time (0-5000ms)
- Pitch: Controls the pitch value of the event (-12st – 12st)
Look at the FMOD project in the Assets folder to get a feel of how the parameters are linked to the effects. Go through the Game Parameter tabs and take a look at the automations.
Parameter Types in FMOD Studio
In the new FMOD Studio 2.0.0 version, two new parameter types have been added to the existing Continuous Parameters. I will quote FMOD’s glossary documentation to explain briefly how these parameter types work:
Continuous Parameters
Continuous Parameters are a type of parameter that use float numbers. Each parameter has a minimum and maximum value and can be set to any floating point value within this range. Like all parameters, the continuous user parameters can be adjusted to represent any variable in the game project. Continuous parameters are most commonly used for variables that can change in very fine or arbitrary increments.
Discrete Parameters (new)
Discrete Parameters are a type of parameter that use integer (int) numbers. Each discrete parameter has a minimum and maximum value and can be set to any integer value within this range.
Labeled Parameters (new)
Labeled Parameters are a type of parameter that use strings. Each Labeled Parameter has a predefined list of labelled values and can be set to any of these values.
Controlling FMOD Parameters with the Studio Parameter Trigger Component in Unity
If we want to change parameters without code, we can use the Studio Parameter Trigger Component in combination with the Studio Event Emitter Component. Open the Parameter-Component scene and click on the Parameter GameObject to get an overview of both components in the Inspector:

We see the Studio Event Emitter component playing an event at the start of the scene that contains four parameters in their default values. Below are two Studio Parameter trigger components that have the Mouse Enter and Mouse Exit callbacks as triggers. The first Trigger Component sets the Reverb parameter to 1 and the Pitch parameter to 3. The second Component sets the parameters back to their default settings.
In Play Mode, if we point to the cube, the parameters will change to the values we set. If we point the mouse at a location outside the cube, the values return to the default settings. Try it out!
Control FMOD Parameters with C# code in Unity
Of course, the whole process is also very simple in C#. Open the Parameter-Code scene and the Effects.cs script.
Like in the last tutorial we will declare our instance in the first place. This time we also declare an EventReference, which allows us to select the FMOD Event in the inspector.
private FMOD.Studio.EventInstance instance;

public FMODUnity.EventReference fmodEvent;
We now also declare four different variables that will change our FMOD parameters in real time:
[SerializeField][Range(0f, 1f)]
private float reverb, delay;

[SerializeField][Range(0f, 5000f)]
private float delayTime;

[SerializeField][Range(-12f, 12f)]
private float pitch;
The [SerializeField] attribute is for making the private variables accessible in the inspector. The Range[min, max] attribute represents these variables with a slider in the inspector, making it easy for us to change these values.
In Unity’s Start() method, we create and start our instance (note how we enter the previously declared string as the event path here):
void Start()
{
  instance = FMODUnity.RuntimeManager.CreateInstance(fmodEvent);
  instance.start();
}
Then, for each FMOD parameter in the Update() method, we use the setParameterByName method to make parameter changes:
instance.setParameterByName("ParameterName", value);In summary, the script looks like this:
using System.Collections;
using System.Collections.Generic;
using UnityEngine;

public class Effects : MonoBehaviour
{
    private FMOD.Studio.EventInstance instance;

    public FMODUnity.EventReference fmodEvent;

    [SerializeField] [Range(0f, 1f)]
    private float reverb, delay;

    [SerializeField] [Range(0f, 5000f)]
    private float delayTime;

    [SerializeField] [Range(-12f, 12f)]
    private float pitch;

    void Start()
    {
        instance = FMODUnity.RuntimeManager.CreateInstance(fmodEvent);
        instance.start();
    }

    void Update()
    {
        instance.setParameterByName("Reverb", reverb);
        instance.setParameterByName("Delay", delay);
        instance.setParameterByName("DelayTime", delayTime);
        instance.setParameterByName("Pitch", pitch);
    }
}
Start the scene and now move the sliders in the inspector.
Setting Labeled Parameters in Unity
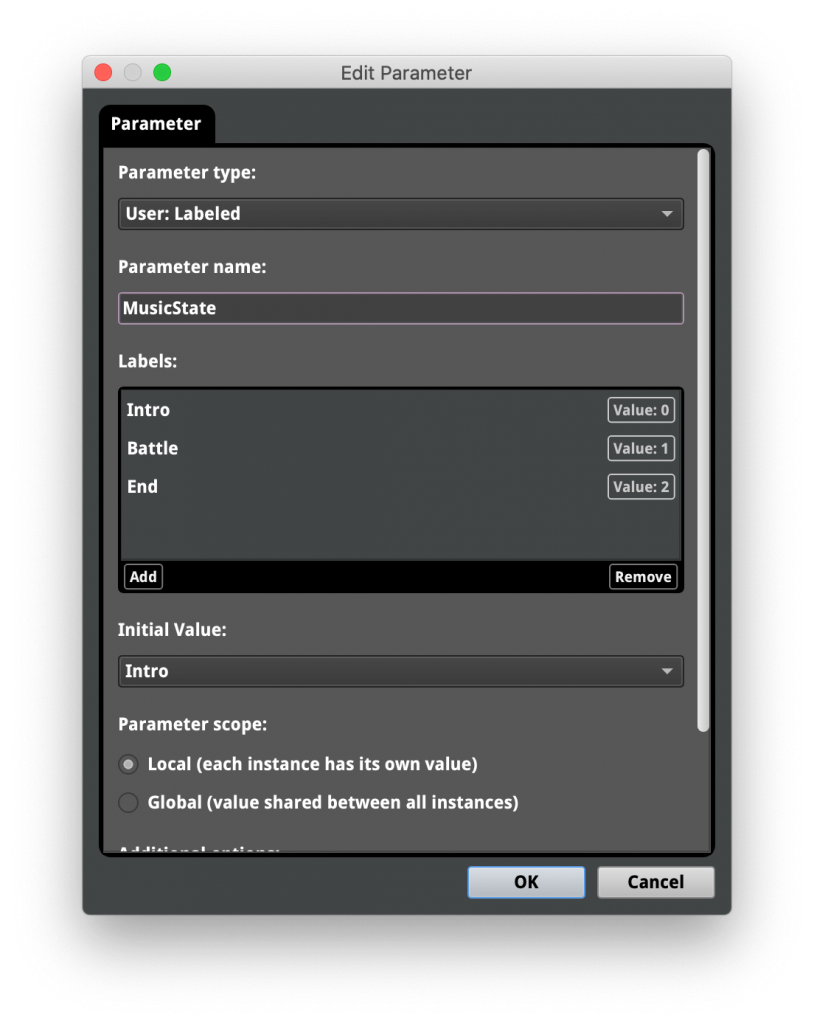
In the included project, I’ve added an example labeled parameter called MusicState. You can set the parameter value for this parameter by calling EventInstance::setParameterByName like shown the other examples. You can find the float values of the Labeled Parameter in the Edit Parameter window in FMOD Studio:

Intro would be 0.0, Battle 1.0 and End 2.0.
Additionaly FMOD introduced EventInstance::setParameterByNameWithLabel in the new 2.02 version. So you can set parameter values for Labeled Parameters using their string label:
EventInstance.setParameterByNameWithLabel("MusicState", "Battle");Using setParameterByID to control FMOD Parameters in Unity
Another way to change parameters in code is to cache the Parameter Id and set the parameter value by id instead of directly passing the parameter name to FMOD. This requires a bit more code but is faster in general when getting or setting parameters multiple times.
To achieve this behaviour, the only addition we need to make is to declare the PARAMETER_ID struct object for each parameter at the start of the class:
private FMOD.Studio.PARAMETER_ID pitchParameterId;In Unity’s start method we create the FMOD Event Instance, then we get the Event Description of the instance. We use the Event Description to get the Parameter Description of the Event by calling getParameterDescriptionByName. We store the ID of the Parameter Description in the pitchParameterId object and start the instance:
void Start()
{
  instance = FMODUnity.RuntimeManager.CreateInstance(fmodEvent);

  FMOD.Studio.EventDescription pitchEventDescription;
  instance.getDescription(out pitchEventDescription);

  FMOD.Studio.PARAMETER_DESCRIPTION pitchParameterDescription;
  pitchEventDescription.getParameterDescriptionByName("Pitch", out pitchParameterDescription);

  pitchParameterId = pitchParameterDescription.id;
  instance.start();
}
In the Update method we now can call setParameterByID and pass our parameter id and the pitch variable as arguments (repeat this step for multiple parameters):
instance.setParameterByID(pitchParameterId, pitch);How to use Global Parameters in FMOD Studio and Unity?
FMOD Studio also supports Global Parameters since version 2.0. This means that different events can have the same parameters and parameter changes affect all event instances. Previously, you had to change the parameters individually for each single event. To activate a Global Parameter, we set the Parameter scope setting to Global in FMOD Studio during the parameter creation step:

Changing Global Parameters with the Global Parameter Trigger Component in Unity
The Global Parameter Trigger Component basically behaves like the normal Parameter Trigger Component. Use this if you want to change Global Parameters without code. This component does not need the Studio Event Emitter as target object and you select the desired parameter directly from a dropdown list:

Control Global Parameters using C# code in Unity
The global parameters are controlled by the System parameter API and have a single value that is shared across all instances. In the code we simply change parameters directly by getting StudioSystem and calling setParameterByName:
FMODUnity.RuntimeManager.StudioSystem.setParameterByName("EQ Global", eq);