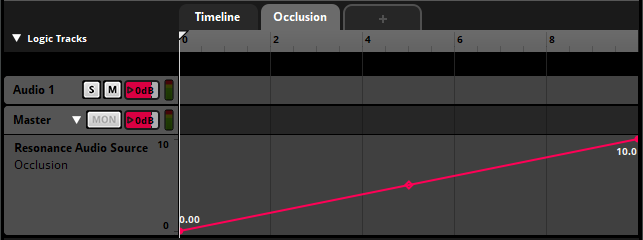
The Resonance Audio Source effect in FMOD Studio contains an Occlusion parameter that indicates the level of occlusion by virtual objects between the source and user:

Increasing the occlusion parameter removes high frequencies from the sound, simulating real occlusion taking place. The problem with this parameter, compared to the Resonance Audio plugin for Unity’s stock audio system, is that it does not work automatically, i.e. it doesn’t update if there is geometry between the audio source and the listener. In fact, there is no way for FMOD to know about the game world and the objects inside it.
In this tutorial we will port the Raycast system that is implemented in the Resonance Audio plugin for Unity to FMOD, so we can automatically drive the occlusion parameter and easily get audio occlusion working. You can see the result we will get in this video example:
Preparation in FMOD Studio
Create a new event, insert an audio file (in my case a music track of mine) into the audio track and add a Resonance Audio Source to the master track. Create a continuous parameter named Occlusion with a range from 0 to 10. Automate the Occlusion value of the Resonance Audio Source with that parameter, following a linear curve around the values:

Build your banks and head over to Unity.
C# Code for the Audio Occlusion behaviour
Studio Listener code modifications
First we open StudioListener.cs and StudioListenerEditor.cs.
In StudioListener.cs we declare a LayerMask called occlusionMask to define which layers should be considered by the occlusion system:
public LayerMask occlusionMask = -1;Since FMOD uses a custom inspector for its Studio Listener component, we need to add some code to the StudioListenerEditor.cs script. This will allow us to see and select the layers directly in the inspector. Look for the code line EditorGUI.EndDisabledGroup(); and add this code snippet after it:
EditorGUI.BeginChangeCheck();
var mask = serializedObject.FindProperty("occlusionMask");
int temp = EditorGUILayout.MaskField("Occlusion Mask", InternalEditorUtility.LayerMaskToConcatenatedLayersMask(mask.intValue), InternalEditorUtility.layers);
mask.intValue = InternalEditorUtility.ConcatenatedLayersMaskToLayerMask(temp);
Don’t forget to add using UnityEditorInternal; at the beginning of the script.
Now the Studio Listener component will show an Occlusion Mask field in which we can select different layers:

FMOD Resonance Audio code modification
Next we need to add code to the FMODResonanceAudio.cs script. Open it and find a place to insert this snippet into the FmodResonanceAudio class:
public static Transform ListenerTransform
{
  get
  {
    if (listenerTransform == null)
    {
      var listener = GameObject.FindObjectOfType <StudioListener>();
      if (listener != null)
      {
        listenerTransform = listener.transform;
      }
    }
    return listenerTransform;
  }
}
private static Transform listenerTransform = null;

public static float ComputeOcclusion(Transform sourceTransform)
{
  var listener = GameObject.FindObjectOfType <StudioListener>();
  occlusionMaskValue = listener.occlusionMask;

  float occlusion = 0.0f;
  if (ListenerTransform != null)
  {
    Vector3 listenerPosition = ListenerTransform.position;
    Vector3 sourceFromListener = sourceTransform.position - listenerPosition;

    int numHits = Physics.RaycastNonAlloc(listenerPosition, sourceFromListener, occlusionHits, sourceFromListener.magnitude, occlusionMaskValue);

    for (int i = 0; i < numHits; ++i)
    {
      if (occlusionHits[i].transform != listenerTransform && occlusionHits[i].transform != sourceTransform)
      {
        occlusion += 1.0f;
      }
    }
  }
  return occlusion;
}

/// Maximum allowed number of raycast hits for occlusion computation per source.
public const int maxNumOcclusionHits = 12;

// Pre-allocated raycast hit list for occlusion computation.
private static RaycastHit[] occlusionHits = new RaycastHit[maxNumOcclusionHits];

// Occlusion layer mask.
private static int occlusionMaskValue = -1;

/// Source occlusion detection rate in seconds.
public const float occlusionDetectionInterval = 0.2f;
This is slightly modified code that we can find in the original ResonanceAudio.cs script. What are we exactly doing here? The ListenerTransform property gets us the Transform of the StudioListener. The ComputeOcclusion() method takes a Transform, in our case that will be the Transform of the object playing audio and shoots some rays from the listener position in the direction of our audio source. It will return a float value that is incremented by 1 for each objects it hits between the listener and audio source.
Writing code for playing FMOD Events with Audio Occlusion
Let’s create a script named AudioOcclusion.cs. We will manually create and play an FMOD instance, so declare an FMOD EventInstance and a string that will contain the event path:
private FMOD.Studio.EventInstance instance;

public FMODUnity.EventReference fmodEvent;
After that, we declare a few variables that are useful for the occlusion behaviour:
[SerializeField]
private bool occlusionEnabled = false;

[SerializeField]
private string occlusionParameterName = null;

[Range(0.0f, 10.0f)] [SerializeField]
private float occlusionIntensity = 1f;

private float currentOcclusion = 0.0f;
private float nextOcclusionUpdate = 0.0f;
The bool variable occlusionEnabled allows us to specify if we actually want the occlusion effect to happen. occlusionParameterName is a string the defines the name of the occlusion parameter in the FMOD event. In the event we created in the beginning it was in fact “Occlusion”. We can change that and insert the parameter name in Unity’s inspector. We will multiply the number of occluding objects with occlusionIntensity to fine tune the occlusion effect.
For the purpose of this tutorial let’s create and start the FMOD instance in Unity’s Start() method:
void Start()
{
  instance = FMODUnity.RuntimeManager.CreateInstance(fmodEvent);
  instance.start();
}
In Unity’s Update() method we set the 3D attributes of the instance, check if we enabled the occlusion in the inspector, if not we set the float variable currentOcclusion to zero. If we instead enable the occlusion, we will pass the transform of the current GameObject as a parameter to the ComputeOcclusion() method and get the number of occlusion objects in currentOcclusion. This will happen at an interval set up in the occlusionDetectionInterval constant in FMODResonanceAudio.cs. We update the parameter of the FMOD instance using the occlusionParameterName string and the currentOcclusion value:
void Update()
{
  if (instance.isValid())
  {
    instance.set3DAttributes(FMODUnity.RuntimeUtils.To3DAttributes(this.gameObject));
    if (!occlusionEnabled)
    {
      currentOcclusion = 0.0f;
    }
    else if (Time.time >= nextOcclusionUpdate)
    {
      nextOcclusionUpdate = Time.time + FMODUnityResonance.FmodResonanceAudio.occlusionDetectionInterval;
      currentOcclusion = occlusionIntensity * FMODUnityResonance.FmodResonanceAudio.ComputeOcclusion(transform);
      instance.setParameterByName(occlusionParameterName, currentOcclusion);
    }
  }
}
Setup in Unity
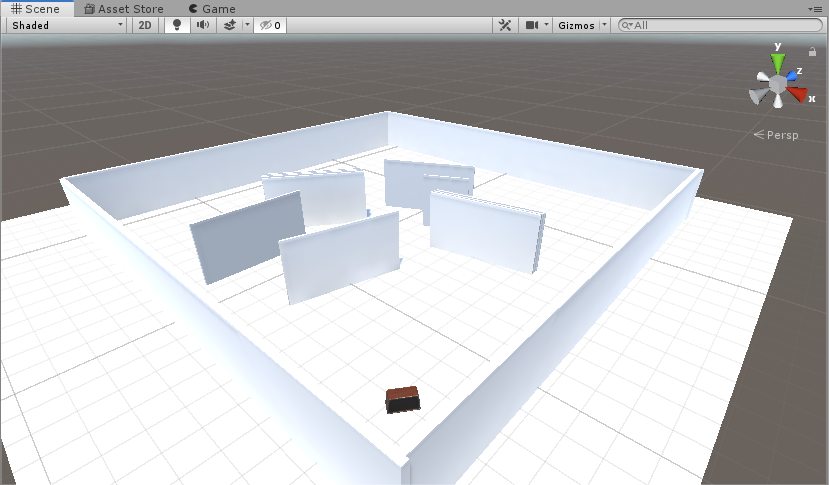
Create a simple test room with a GameObject that will contain the AudioOcclusion script placed in the corner of the room. Add some walls made out of cubes so we can test the occlusion behaviour:

Briefly take a look at the AudioOcclusion script in the inspector:

It is straightforward:
- Select the event we created at the beginning of this tutorial, activate the occlusion property and enter a parameter, in our case “Ccclusion”.
- Now select all the walls, create a new layer and assign the walls to that layer. I simply called the layer “Wall”.
- Locate the Studio Listener GameObject and select the same Occlusion Mask layer.
- Go into Play Mode and you should be able to hear the occlusion effect taking place when moving behind one or multiple walls.
Enabling Audio Occlusion in the Studio Event Emitter Component
We can port the occlusion code that we wrote in AudioOcclusion.cs directly into the Studio Event Emitter component. Open StudioEventEmitter.cs and StudioEventEmitterEditor.cs.
In StudioEventEmitter.cs we copy over everything we added to FmodResonanceAudio.cs:
public static Transform ListenerTransform
{
  get
  {
    if (listenerTransform == null)
    {
      var listener = GameObject.FindObjectOfType <StudioListener> ();
      if (listener != null)
      {
        listenerTransform = listener.transform;
      }
    }
    return listenerTransform;
  }
}

private static Transform listenerTransform = null;

public static float ComputeOcclusion(Transform sourceTransform)
{
  var listener = GameObject.FindObjectOfType <StudioListener>();
  occlusionMaskValue = listener.occlusionMask;

  float occlusion = 0.0f;
  if (ListenerTransform != null)
  {
    Vector3 listenerPosition = ListenerTransform.position;
    Vector3 sourceFromListener = sourceTransform.position - listenerPosition;

    int numHits = Physics.RaycastNonAlloc(listenerPosition, sourceFromListener, occlusionHits, sourceFromListener.magnitude, occlusionMaskValue);

    for (int i = 0; i < numHits; ++i)
    {
      if (occlusionHits[i].transform != listenerTransform && occlusionHits[i].transform != sourceTransform)
      {
        occlusion += 1.0f;
      }
    }
  }
  return occlusion;
}

/// Maximum allowed number of raycast hits for occlusion computation per source.
public const int maxNumOcclusionHits = 12;

// Pre-allocated raycast hit list for occlusion computation.
private static RaycastHit[] occlusionHits = new RaycastHit[maxNumOcclusionHits];

// Occlusion layer mask.
private static int occlusionMaskValue = -1;

/// Source occlusion detection rate in seconds.
public const float occlusionDetectionInterval = 0.2f;

public bool occlusionEnabled = false;
public string occlusionParameterName = null;
[Range(0.0f, 10.0f)]
public float occlusionIntensity = 1.0f;
public float currentOcclusion = 0.0f;
public float nextOcclusionUpdate = 0.0f;
Add an Update() method at the end of script with following code lines:
void Update()
{
  if (instance.isValid())
  {
    if (!occlusionEnabled)
    {
      currentOcclusion = 0.0f;
    }
    else if (Time.time >= nextOcclusionUpdate)
    {
      nextOcclusionUpdate = Time.time + occlusionDetectionInterval;
      currentOcclusion = occlusionIntensity * ComputeOcclusion(transform);
      instance.setParameterByName(occlusionParameterName, currentOcclusion);
    }
  }
}
Since FMOD also uses custom editor scripts here, we need to add some code to StudioEventEmitterEditor.cs. In OnInspectorGUI() we declare these serialized properties directly under maxDistance:
 var occlusionEnabled = serializedObject.FindProperty("occlusionEnabled");
 var occlusionParameterName = serializedObject.FindProperty("occlusionParameterName");
 var occlusionIntensity = serializedObject.FindProperty("occlusionIntensity");
Look for the code line:
EditorEventRef editorEvent = EventManager.EventFromPath(eventPath.stringValue);and add this code snippet after that:
EditorGUILayout.PropertyField(occlusionEnabled, new GUIContent("Enable Occlusion"));
if (occlusionEnabled.boolValue)
{
  EditorGUILayout.PropertyField(occlusionParameterName, new GUIContent("Occlusion Parameter Name"));
  EditorGUILayout.PropertyField(occlusionIntensity, new GUIContent("Occlusion Intensity"));
}
This code will only check if we have clicked on the Enable Occlusion checkbox and show the other occlusion properties based on that. That’s it! Take a look at your new Studio Event Emitter component:
