The FMOD mixer can be controlled with all its functions in Unity. In this tutorial we change the volume of buses, VCAs and trigger snapshots directly from Unity using code.
FMOD Studio Bus volume control in Unity
The volume of a bus in Unity can be controlled in three simple steps:
- Declare bus
- Get the bus path
- Adjust the volume of the bus
Let’s take a closer look at these steps.
Declaring an FMOD Bus
Just as with simple instances, we have to declare the bus first:
FMOD.Studio.Bus bus;Retrieving the Bus
Now we can call our desired Bus in Unity’s Start() method:
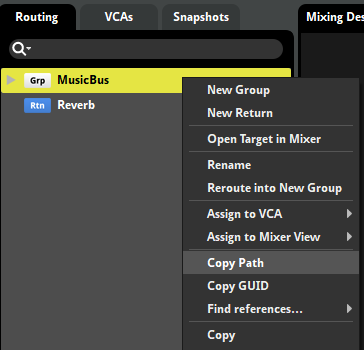
bus = FMODUnity.RuntimeManager.GetBus("bus:/MusicBus");bus:/MusicBus is a string and refers to the groups created in the routing tab in the FMOD Studio Mixer. We can copy this path by right-clicking on the group and selecting the Copy Path option:

Adjusting the volume of a Bus
In the Update() method we can now set our desired volume for the bus by using Bus.setVolume. setVolume takes a float number ranging from 0 (mute) to 1 (full volume). Of course it is also possible to work with the dB scale. Therefore we declare two floats:
[SerializeField] [Range(-80f, 10f)]
private float busVolume;
private float volume;
busVolume is a float that we can control via a slider in the inspector. It should represent our desired dB volume value. With volume we use a formula to convert dB to a linear scale:
volume = Mathf.Pow(10.0f, busVolume / 20f);We then can call Bus::setVolume to set the volume of the Bus with our desired value. Keep in mind that the value is applied as a scaling factor to the volume level set in FMOD Studio. The complete script for the bus looks like this:
using System.Collections;
using System.Collections.Generic;
using UnityEngine;

public class Bus: MonoBehaviour {

  FMOD.Studio.EventInstance instance;
  FMOD.Studio.Bus bus;

  [FMODUnity.EventRef]
  public string fmodEvent;

  [SerializeField][Range(-80f, 10f)]
  private float busVolume;
  private float volume;

  void Start()
  {
    instance = FMODUnity.RuntimeManager.CreateInstance(fmodEvent);
    instance.start();
    bus = FMODUnity.RuntimeManager.GetBus("bus:/MusicBus");
  }

  void Update()
  {
    volume = Mathf.Pow(10.0f, busVolume / 20f);
    bus.setVolume(volume);
  }
}
FMOD Studio VCA volume control in Unity
FMOD Studio gives us the ability to couple busses to specific VCAs. This is useful, for example, when we want to control the volume of music and sound effects separately. From a code perspective, the volume control works the same as for the busses. But this time we declare a VCA:
FMOD.Studio.VCA vca;Instead of GetBus() we use GetVCA():
vca = FMODUnity.RuntimeManager.GetVCA("vca:/MusicVCA");Then we call VCA::setVolume to set the volume of the VCA:
vca.setVolume(volume);Keep in mind that the value is applied as a scaling factor to the volume level set in FMOD Studio. The complete script for VCAs looks like this:
using System.Collections;
using System.Collections.Generic;
using UnityEngine;

public class VCA: MonoBehaviour {

  FMOD.Studio.EventInstance instance;
  FMOD.Studio.VCA vca;

  [FMODUnity.EventRef]
  public string fmodEvent;

  [SerializeField][Range(-80f, 10f)]
  private float vcaVolume;
  private float volume;

  void Start()
  {
    instance = FMODUnity.RuntimeManager.CreateInstance(fmodEvent);
    instance.start();
    vca = FMODUnity.RuntimeManager.GetVCA("vca:/MusicVCA");
  }

  void Update()
  {
    volume = Mathf.Pow(10.0f, vcaVolume / 20f);
    vca.setVolume(volume);
  }
}
Trigger FMOD Snapshots in Unity
Snapshots also behave mostly like normal events. Triggering snapshots is really like manually playing 2D/3D events.
First we declare the snapshot instance:
FMOD.Studio.EventInstance snapshot;Then we create the instance and play or stop it in Unity’s Update() method:
void Update()
{
  if (Input.GetKeyDown(KeyCode.Space))
  {
    snapshot = FMODUnity.RuntimeManager.CreateInstance("snapshot:/FilterMusic");
    snapshot.start();
  }
  else if (Input.GetKeyDown(KeyCode.LeftControl))
  {
    snapshot.stop(FMOD.Studio.STOP_MODE.ALLOWFADEOUT);
    snapshot.release();
  }
}
As you can see here, only the path of the event changes. Instead of event:/ we now use snapshot:/ to point to the correct path. Have a look at the attached project to experiment with the snapshots yourself.