Playing FMOD events in Unity is not particularly difficult, but we have a number of methods available that make more or less sense depending on the result we want to achieve. In this tutorial we will take a closer look at how to play FMOD events in Unity.
Check out the video version of this tutorial:

This video tutorial is based on an older version of FMOD Studio (2.0.1) and Unity 2019.1.2f1. Most of the functionality is still valid, although the API has changed a bit. The document below always contains information about the latest version.
How to play FMOD Events in Unity?
FMOD events in Unity can be played in three different ways:
- Using the FMOD Studio Event Emitter Component
- Using the PlayOneShot helper method in the code.
- By manual declaration and start/stop of the Event in the code.
All possibilities have practical advantages and disadvantages:
- The Event Emitter allows us to play events without code. In combination with the Studio Parameter Trigger component, we can also change parameters.
- With PlayOneShot we can play a sound with one line of code. FMOD automatically takes care of the playback and stops/releases the sound instance from main memory when the Event finishes playing. One disadvantage of this method is that no parameter changes are possible without modifying FMOD’s RuntimeManager source code. If the sound is to be changed by an in-game parameter, PlayOneShot is not suitable. However, it is very easy to overload the PlayOneShot method in the code to make this possible. Read the tutorial on using PlayOneShot with FMOD parameters if you want to do this.
- Manual Event playback, on the other hand, requires more code, but is much more flexible to handle, as you can specify exactly when a sound or loop should play and stop, and where parameter changes should be made.
Playing FMOD Events with the Studio Event Emitter Component
For simple Event playback, we create a new GameObject and insert the Studio Event Emitter Component into the GameObject:

Here we find various setting options that we can change to influence the playback of events. Under Play Event and Stop Event we determine when the Event should be played and stopped. Under Event, we select the Event from a list of events that we have previously created in FMOD Studio. Go to Play Mode, activate and deactivate the created GameObject to hear the sound.
PlayOneShot
The PlayOneShot method immediately creates, plays and releases an instance of an FMOD Event. The PlayOneShotAttached method creates an instance of an event at a specific location. The event is played to the end and parameters cannot be set. If we need to set a parameter when using PlayOneShot, we can easily change the code of FMOD’s RuntimeManager. Follow the tutorial on using PlayOneShot with FMOD parameters if you need this behaviour. The code snippet for PlayOneShot is:
FMODUnity.RuntimeManager.PlayOneShot("event:/Example");event:/example is a path that points to an Event that we create in FMOD Studio. The paths follow the folder structure in the FMOD Studio Event hierarchy. Alternatively, you can right-click on an Event in FMOD Studio to copy its path.
We insert this piece of code into the Update() method of a Unity script. In the if statement, we check whether the space bar is pressed. If it is, the Event is played:
if (Input.GetKeyDown(Keycode.Space))
{
  FMODUnity.RuntimeManager.PlayOneShot("event:/Example");
}
The complete code looks like this:
using System.Collections;
using System.Collections.Generic;
using UnityEngine;

public class PlayOneShotExample : MonoBehaviour
{
    void Update()
    {
        if (Input.GetKeyDown(KeyCode.Space))
        {
            FMODUnity.RuntimeManager.PlayOneShot("event:/Example");
        }
    }
}
If you are now in Unity’s play mode and press the space bar, you will hear the Event you selected as a sample event. In the upper left corner you will also see a small FMOD debug window that shows the volume levels in RMS and the number of voices playing.
What is the difference between an FMOD Event and an instance?
An Event is a sound unit that you create in FMOD Studio. It can have various tracks, parameters and automations. A copy or instance of the event is created in-game. You don’t start the Event itself, but you create an instance from that Event. This allows you to have multiple copies of an event playing at the same time.
Manual playback of FMOD Events with C# code
Four steps are necessary to manually play an FMOD Event in Unity:
- We need to declare an instance.
- Tell Unity when to create an instance of the FMOD event and where the event is located.
- Start or stop the instance.
- Release the instance from memory.
Let us now go through these steps one by one.
Declaring an FMOD instance
We need to declare all the Events to be used in this script as an instance before proceeding. In our case, we declare a FMOD.Studio.EventInstance by enterering this line of code at the top of our Unity class/script:
private FMOD.Studio.EventInstance instance;Creating an FMOD instance
In the Start() method of the script we now create the instance by calling the helper method CreateInstance in the RuntimeManager helper class:
void Start()
{
    instance = FMODUnity.RuntimeManager.CreateInstance("event:/Example");
}
Starting the FMOD EventInstance
After that, the Event can be started by calling instance.start(). I have also added the line to the Update() method under an if statement so that the sound is only played when we press the space bar:
if (Input.GetKeyDown(KeyCode.Space))
{
    instance.start();
}
If you look again at the FMOD debug window in the upper left corner, you will probably notice that pressing the space bar several times only plays one instance of the Event, compared to, for example, PlayOneShot. The sound is cut off each time. This is because we created the instance in the Start() method. This method is executed once at the start of the game. If we want to have a separate instance for each sound played, we also need to move the instance creation code to the If statement block.
Attention: With this manual method, the instances are not automatically released from the memory. This can lead to problems. We add the code instance.release() after the instance has been started so that the instance is deleted.
The complete code for the script looks like this:
using System.Collections;
using System.Collections.Generic;
using UnityEngine;

public class ManualExample: MonoBehaviour
{
  private FMOD.Studio.EventInstance instance;

  void Update()
  {
    if (Input.GetKeyDown(KeyCode.Space))
    {
      instance = FMODUnity.RuntimeManager.CreateInstance("event:/Example");
      instance.start();
      instance.release();
    }
  }
}
How to play FMOD loops in Unity?
Loops can be played most safely using the manual method. But how do we create loops and how do we play and stop them in Unity?
In FMOD Studio, a loop region can be created by right-clicking on the timeline and selecting the “Add Loop Region” entry:

Then we can move the loop region as far as we want, similar to some DAWs. Move the loop region so that it encompasses the entire audio instrument, save and build the project.
In your Unity project, try to replace the previous Event with this new example You will notice that the sound is now looping if you play the Event back.
How to stop FMOD loops in Unity?
With the code line:
instance.stop(FMOD.Studio.STOP_MODE.ALLOWFADEOUT);the instance can be stopped. In our Update() method we insert an If-statement which stops our sound when pressing the left control key (CTRL):
if (Input.GetKeyDown(KeyCode.LeftControl))
{
  instance.stop(FMOD.Studio.STOP_MODE.ALLOWFADEOUT);
  instance.release();
}
STOP_MODE.ALLOWFADEOUT respects the release time in the AHDSR modulator of the Event (if any present). If we want an abrupt stop, we use STOP_MODE.IMMEDIATE instead.
The complete code for a loop looks like this:
using System.Collections;
using System.Collections.Generic;
using UnityEngine;

public class LoopExample: MonoBehaviour
{
  private FMOD.Studio.EventInstance instance;

  void Update()
{
    if (Input.GetKeyDown(KeyCode.Space))
    {
      instance = FMODUnity.RuntimeManager.CreateInstance("event:/LoopEvent");
      instance.start();
    }
    if (Input.GetKeyDown(KeyCode.LeftControl))
    {
      instance.stop(FMOD.Studio.STOP_MODE.ALLOWFADEOUT);
      instance.release();
    }
  }
}
We can now start the loop alternately with the space bar and stop our sound with the left CTRL key. Try it out!
Playing 3D FMOD Events in Unity
3D Events differ from 2D Events in that they play a 3D sound with spatialization (Spatializer effect). The effects adds volume attenuation based on the distance from the instance to the listener, and a panning based on the position of the instance in the direction in which the listener is directed.
An Event doesn’t necessarily need a spatialization effect to be a 3D event. It can also use built-in parameters (such as distance, direction, etc.) to automate properties such as volume and filters to give the impression of spatialization.
In FMOD Studio, a 2D event can be easily converted to a 3D event by adding the Spatializer effect to the master track of an event:
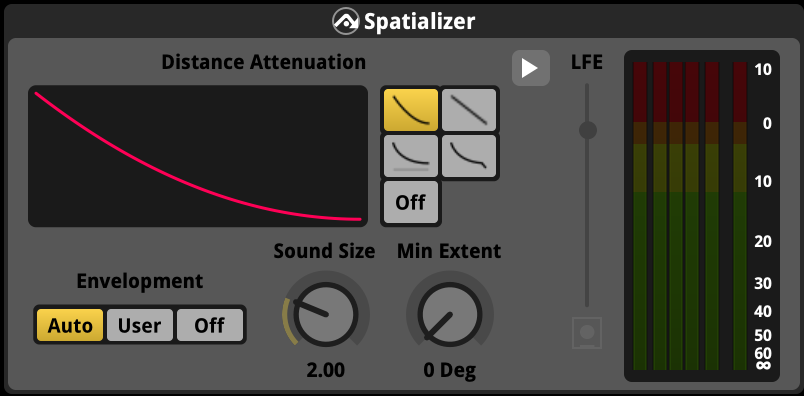
You can find in-depth information about the spatializer effect in the FMOD documentation. I will list the most important features here:
- Envelopment: Envelopment determines the extent of the event at any distance from the listener. The Auto mode sets the minimum expansion to 0 degrees and sets the Sound Size to twice the Min-Distance property of the Event.
- The User mode allows us to manually set the sound size and minimum expansion of the Spatializer, and the Off Mode disables the sound size and minimum expansion.
Min & Max Distance and Distance Attenuation Curve: The Min and Max distance of the Event and the Distance Attenuation curve of the Spatializer determine together how much the signal is attenuated at different distances. The signal is not attenuated if the listener is within the minimum distance of the spatializer, is -oo dB if the listener is outside the maximum distance, and drops according to a linear quadratic curve as the listener moves from the minimum distance to the maximum distance. Depending on the curve, the signal drops off differently.
The Min & Max Distance settings have been moved to the Event Macros at the bottom right of the screen in the latest FMOD Studio version:

In the code itself, we only need to make one minor change, namely to tell FMOD where the instance is located in 3D space. We also have two different options here. Either we do this directly in the Update() method of a script with this line of code:
instance.set3DAttributes(FMODUnity.RuntimeUtils.To3DAttributes(gameObject));Or we append the information to the GameObject once after we have created the instance:
FMODUnity.RuntimeManager.AttachInstanceToGameObject(instance, GetComponent<Transform>(), GetComponent<Rigidbody>());Depending on whether the GameObject has a RigidBody component, we can use one or the other method. The second method uses the RigidBody to determine the velocity of the GameObject and to activate a doppler effect. The example code for a 3D event looks like this:
using System.Collections;
using System.Collections.Generic;
using UnityEngine;

public class Event3DExample: MonoBehaviour
{
  private FMOD.Studio.EventInstance instance;

  void Start()
  {
    instance = FMODUnity.RuntimeManager.CreateInstance("event:/3DEvent");
    FMODUnity.RuntimeManager.AttachInstanceToGameObject(instance, GetComponent<Transform>(), GetComponent<Rigidbody>());
    instance.start();
  }

  void Update()
  {
    // instance.set3DAttributes(FMODUnity.RuntimeUtils.To3DAttributes(gameObject));
  }
}